Let’s talk about programming. Since you’re a Unity developer then most probably you had to do some programming, unless you use Playmaker
or something similar. As a programmer you most probably want your code
to be as readable as possible, because sooner or later you will have to
work on it knowing why you’ve done something in a particular way. What
is your method of making your code more readable? Do you use in-code
comments? If yes, you’re doing it terribly wrong.
Why comments are bad
You may now think of me as of an idealist. Thinking of a world without conflicts, religion, etc.
Well, it’s nothing like that. Every source code requires more or less
comments, but in most cases, when you may want to write one, most
probably there’s a better solution.
Why do I state that using comments is bad?
Comments can get quickly outdated
Consider this piece of code:
1
2
3
4
5
6
7
8
voidUpdate()
{
// finish level after 60 seconds
if(Time.timeSinceLevelLoad>=60)
{
SceneManager.LoadScene("Score Board");
}
}
And let’s say someone will refactor it:
1
2
3
4
5
6
7
8
9
10
publicfloatPlayTime=120;
voidUpdate()
{
// finish level after 60 seconds
if(Time.timeSinceLevelLoad>=PlayTime)
{
SceneManager.LoadScene("Score Board");
}
}
The person who did the refactoring replaced 60 seconds with PlayTime
field and then made it 120. It’s a common “mistake” to leave the
comment. Even if the comment would be updated, anyone who will change
the PlayTime value won’t be aware of a comment in Update() function that is now lying to us.
Comments need to be read along with the code
Isn’t this a purpose of comments existence? Well it actually it is,
but if there’s a comment then it means that reader needs more time to
get through the code because he or she needs to analyze code and all the
comments. It’s not only the matter of how much there’s to read – code
that needs a comment can be understood only when reader can get
understanding of a comment – so there’s as twice as much things to
analyze.
Now I’d like to show you some real scenarios in which comments were used, as well as how it can be improved and why.
Use meaningful variable names
Something so obvious, yet frequently ignored. How often did you stumble upon variable names like a, b, x2, etc.? Let’s take this code example:
1
2
3
4
5
6
7
8
9
// finds out distance between the player and the enemy
// attack the player with claws or poison as secondary attack
enemy.Attack(player,Attack.Claws,Attack.Poison);
}
First of all you should know that using short variable names won’t
make your application faster. It only will make your code less
readable. Always remember to use meaningful variable names. “Meaningful”
does not mean long, so if you want to use a short version of variable
name, you are allowed to do so, provided that it can be easily decoded
(pointer -> ptr, texture -> tex). Using too long variable names
can easily backfire with code that is too bloated, so you have to
make compromises.
// attack the player with claws or poison as secondary attack
enemy.Attack(player,Attack.Claws,Attack.Poison);
}
Note that we not longer need the comment because playerToEnemyDist variable name tells us enough about what we’re doing in that line.
One more note about variable names: for loops are frequently using a counter
variable. It’s perfectly legal to use “i” or “j” as a counter name
since it is widely used style of naming. The same applies for “x”, “y”
and “z” while we’re making operations on coordinates.
Do not use magic numbers
“Magic” numbers are numerical values that exists inside methods
and it may be difficult to know why these numbers are set in a
particular way. Magic numbers should be extracted into variables, fields
or even class constants with meaningful names.
// attack the player with claws or poison as secondary attack
enemy.Attack(player,Attack.Claws,Attack.Poison);
}
}
Do not explain ifs
If you have an if statement and it may be not clear what it
does and why, you may be temped to make a comment to that statement.
Before you do, think of extracting your if () condition (what’s inside) into a meaningfully-named method.
1
2
3
4
5
6
7
8
9
10
11
12
13
14
15
16
17
18
privatestaticconstfloatEnemyAttackDistance=100;
voidUpdate()
{
if(EnemyIsNearPlayer())
{
// attack the player with claws or poison as secondary attack
By extracting if condition we could move distance calculations into a separate method so Update() function has much less code to read now.
EnemyIsNearPlayer() function name is self-descriptive. We do not need a comment here.
Watch out for function parameters
See this code?
1
2
// attack the player with claws or poison as secondary attack
enemy.Attack(player,Attack.Claws,Attack.Poison);
How you can tell if the poison is a secondary attack without a
comment? Well, you cannot. This scenario is a good example where a
comment is really needed. Still, if enemy’s class is something that you
can refactor, consider using a struct instead of raw parameters:
At first glance it may look like producing more code instead of
using comments for much simpler code, but trust me – this will greatly
make you and your colleagues’ life much better in the long run.
Still, if you feel that a comment is really needed and there’s
nothing else to do – go ahead! There are situations where you cannot do
much about it. Yet remember that the information in your comments may
someday become outdated, so keep it simple and safe.
saw a person on Quora the other day, asking how programmers are able
to write projects that consist of over 10,000 lines of code. When
software gets bigger, it is more difficult to maintain and that’s a
fact. So here’s the thing – if you don’t keep your project organized,
you’re going to have a hard time to keep the pace. Later on, you will
find yourself wasting time with a messy project instead of adding new
features. This is also true regarding any Unity Project. Here are (in my
opinion) the most important tips that will help you with keeping your
project organized.
1. Directory Structure
We cannot talk about organization without mentioning organizing
project directory structure. Unity gives you a total freedom in that
matter, but because of that, it can frequently get really messy. This is
the directory structure I personally use:
3rd-Party
Animations
Audio
Music
SFX
Materials
Models
Plugins
Prefabs
Resources
Textures
Sandbox
Scenes
Levels
Other
Scripts
Editor
Shaders
Do not store any asset files in the root directory. Use subdirectories whenever possible.
Do not create any additional directories in the root directory, unless you really need to.
Be consistent with naming. If you decide to use camel case for directory names and low letters for assets, stick to that convention.
Don’t try to move context-specific assets to the general directories.
For instance, if there are materials generated from the model, don’t
move them to Materials directory because later you won’t know where
these come from.
Use 3rd-Party to store assets imported from the Asset Store. They usually have their own structure that shouldn’t be altered.
Use Sandbox directory for any experiments you’re not
entirely sure about. While working on this kind of things, the last
thing that you want to care about is a proper organization. Do what you
want, then remove it or organize when you’re certain that you want to
include it in your project. When you’re working on a project with other
people, create your personal Sandbox subdirectory like: Sandbox/JohnyC.
2. Scene hierarchy structure
Next to the project’s hierarchy there’s also scene hierarchy. As
before, I will present you a template. You can adjust it to your needs.
Management
GUI
Cameras
Lights
World
Terrain
Props
_Dynamic
There are several rules you should follow:
All empty objects should be located at 0,0,0 with default rotation and scale.
When you’re instantiating an object in runtime, make sure to put it
in _Dynamic – do not pollute the root of your hierarchy or you will find
it difficult to navigate through it.
For empty objects that are only containers for scripts, use “@” as prefix – e.g. @Cheats
3. Use prefabs for everything
Prefabs in Unity are not perfect, but they are the best thing you
will find to share pre-configured hierarchies of objects. Generally
speaking, try to prefab everything that you put on your scenes. You should be able to create a new level from an empty scene just by adding one or more prefabs to it.
The reason why you should use prefabs is that when a prefab changes,
all the instances change too. Have 100 levels and want to add a camera
effect on all of them? Not a problem! If your camera is a prefab, just
add a camera effect to the camera prefab!
Be aware that you cannot have a prefab in another prefab.
Use links instead – have a field that requires a prefab to be assigned
and make sure to assign it when instance is created. Consider
auto-connecting prefab instances in Awake() or OnEnable() when it makes sense.
4. Learn how to use version control system (VCS)
You
may already know something about GIT, Subversion or any other VCS out
there. As a matter of fact, “knowing something” is only a small piece of
what you may learn. You should focus on learning about important but
infrequently used features of VCS of your choice. Why? Mostly because
VCS systems are much more powerful that you think, and unfortunately
many users are using these as nothing more than a backup and
synchronized solutions. For example, did you know that GIT allows you to
stash your changes, so you can work on them later without committing
anything to your master branch?
Programmers tend to comment out blocks of code in case it’s needed
later. Don’t do that! If you’re using VCS learn how to quickly browse
previous versions of a file. When you are familiar with it, your code
looks a lot nicer without unnecessary block of commented code.
Here’s a nice resource of tips for GIT users: http://gitready.com/
5. Learn to write editor scripts
Unity is a great game engine in the matter of extensibility (see
Asset Store). Learn how to write editor scripts and utilize this
knowledge. You don’t necessary need to create fancy GUI for your
scripts, it can be something simple, as menu entries that are doing
something useful. Here are some examples of editor scripts that I have
created not so long ago:
Google Sheets .csv download – I had a translation spreadsheet saved
on Google Drive. It automatically downloaded the newest version as
.csv file, so I never had to do it manually.
Randomize the position, rotation and size of trees – I had a lot of trees and wanted it to look more like a forest than a grid.
Create distribution – Built for specified target, zips all the files and copy to the right place.
String replace in the sources – I had several files that contained the application version.
Defensive programming is a form of defensive design intended to ensure the continuing function of a piece of software under unforeseen circumstances. Defensive programming techniques are used especially when a piece of software could be misused.
Generally when you’re writing MonoBehaviours, you should make sure that:
All needed references are set
All required components are present
If you’re using singletons, make sure that they exists
If you’re searching for objects and expect to find something, do it as fast as possible
After you learn how to write editor script, you should be able to
write a set of in-editor cheats. It can work as menu entry that unlocks
something (all levels for instance). It’s really easy to create:
1
2
3
4
5
6
7
8
9
10
11
12
13
classCheats
{
[MenuItem("My Game/Cheats/Unlock All Levels")]
publicstaticvoidUnlockAllLevels()
{
if(Application.isPlaying)
{
// unlock code here...
}else{
Debug.LogError("Not in play mode.");
}
}
}
Generally you should write cheats that will allow you to:
Unlock all levels, characters, items etc
Give you immortality
Add/subtract values like time, money, coins etc
Allow you to see things not meant to be seen by players
Anything else that will help you with testing your game
Of course more practical (but harder to write) are in-game cheats.
These type of cheats can be executed outside Unity editor, but you have
to think how you would like to execute it. See our other article about implementing cheats subsystem controlled by mouse.
The way shaders allow you to communicate the rendering properties of your material to their lighting model is via a surface output. It is basically a wrapper around all the parameters that the current lighting model needs. It should not surprise you that different lighting models have different surface output structs. The following table shows the three main output structs used in Unity 5 and how they can be used:
The SurfaceOutput struct has the following properties:
fixed3 Albedo;: This is the diffuse color of the material
fixed3 Normal;: This is the tangent space normal, if written
fixed3 Emission;: This is the color of the light emitted by the material (this property is declared as half3 in the Standard Shaders)
fixed Alpha;: This is the transparency of the material
half Specular;: This is the specular power from 0 to 1
fixed Gloss;: This is the specular intensity
The SurfaceOutputStandard struct has the following properties:
fixed3 Albedo;: This is the base color of the material(whether it’s diffuse or specular)
fixed3 Normal;
half3 Emission;: This property is declared as half3, while it was defined as fixed in SurfaceOutput
fixed Alpha;
half Occlusion;: This is the occlusion (default 1)
half Smoothness;: This is the smoothness (0 = rough, 1 = smooth)
half Metallic;: 0 = non-metal, 1 = metal
The SurfaceOutputStandardSpecular struct has the following properties:
fixed3 Albedo;.
fixed3 Normal;.
half3 Emission;.
fixed Alpha;.
half Occlusion;.
half Smoothness;.
fixed3 Specular;: This is the specular color. This is very different from the Specular property in SurfaceOutput as it allows specifying a color rather than a single value.
Using a Surface Shader correctly is a matter of initializing the surface output with the correct values.
There are two ways to delete a project in the Unity’s project
wizard. The first one is simply deleting, renaming or moving the
directory directly from its location. The project wizard is smart enough
and this is the recommended option.
The second one requires administrator privileges and deleting the
registry entries associated with the projects we want to get rid of from
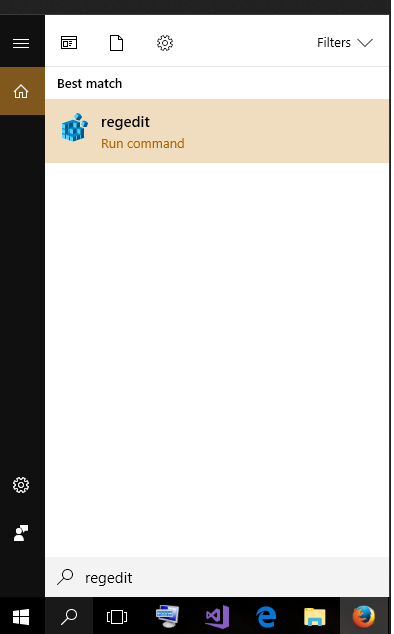
the wizard’s list without deleting, moving or renaming the directories. 1 - Go to Windows registry (run regedit.exe).
2 - In the Windows registry, go to HKEY_CURRENT_USER/Software/Unity Technologies/Unity Editor 5.x/
4- Find the entries which names begin with “RecentlyUsedProjectPaths-“. They’re numbered. If you click on the entry you can see your project path. 5- Select and delete the entries you want to get rid of.
Reference: This post is updated version of the solution from http://jorge.palacios.co/clean-unitys-project-wizard-in-unity-4-x/
Why is it colder at the poles and hotter on the equator? This question,
which seems completely unrelated to shaders, is actually fundamental to
understand how lighting models work. As explained in the previous part
of this tutorial, surface shaders use a mathematical model to predict
how light will reflect on triangles. Generally speaking, Unity
supports two types of shading techniques, one for matte and one for
specular materials. The former ones are perfect for opaque surfaces,
while the latter ones simulate objects which reflections. The Maths
behind these lighting models can get quite complicated, but
understanding how they work is essential if you want to create your own,
custom lighting effect. Up to Unity4.x, the default diffuse lighting
model was based on the Lambertian reflectance.
Diffuse surfaces: the Lambertian model
Going back to the initial question, the
reason why the poles are colder, is because they receive less sunlight
compared to the equator. This happens because of their relative
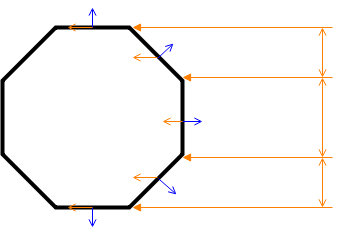
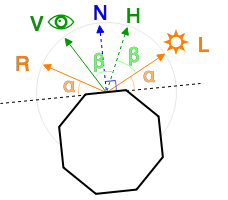
inclination from the sun. The following diagram shows how the polar
edges of the octagon receive sensibly less light compared the frontal
one:
The blue line represents the normal of
the face, which is an orthogonal vector of unit length. The orange one
represents the direction of the light. The amount of light on the fade depends on the angle between the normal and the light direction . In the Lambertian model, this quantity is equal to the vertical component of the incident light ray:
Which can be expressed as:
where is the length of (which is one by definition) and is the angle between and . This operation, in vector algebra, is known as dot product as was briefly introduced in the previous post. Formally, it is defined as the follow:
and is available in Cg / HLSL using the function
dot. It returns a number ranging from -1 to +1 which is zero when the vectors are orthogonal, and 1
when they are parallel. We’ll use it as a multiplier coefficient to
determine how much light triangles receive from a light source.
The Lambertian shader
We now have all the necessary background
to understand how a Lambertian model can be implemented in a shader. Cg
/ HLSL allows to replace the standard Lambertian model with a custom
function. In line 8, using
SimpleLambert in the directive
#pragma surface forces the shader to search for a function called
LightingSimpleLambert:
Lines 19-25 shows how the Lambertian model can be naively re-implemented in a surface shader.
NdotL represents the coefficient of intensity, which is then multiplied to the colour of the light. The parameters
atten is
used to modulate the intensity of the light. The reason why it is
multiplied by two is… a trick initially used by Unity3D to simulate
certain effects. As explained by Aras Pranckevičius,
it has been kept in Unity4 for backward compatibility. This has been
finally fixed in Unity5, so if you’re reimplementing a Lambertian model
for Unity5, just multiply by one.
Understanding how the standard lighting
model works is an essential step if we want to change it. Many
alternative shading techniques, in fact, still use the Lambertian model
as their first step.
Toon shading
One of the most used styles in games lately is the toon shading (also known as cel shading).
It’s a non photorealistic rendering style which changes the way light
reflects on a model to give the illusion it has been hand drawn. To
implement this style, we need to replace the standard lighting model
used so far with a custom one. The most common technique to achieve this
style is to use an additional texture, called
_RampTex in the shader below.
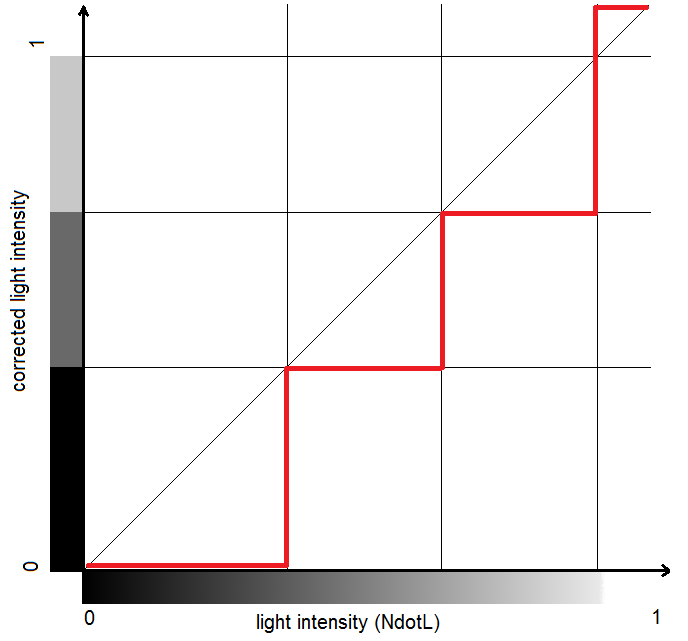
The
LightingToon model calculates the Lambertian coefficient of intensity
NdotL and
uses the ramp texture to re-map it onto a different set of values. In
this case, to restrict the intensity to four values only. Different ramp
textures will achieve slightly different variants of toon shading.
Specular surfaces: the Blinn-Phong model
The Lambertian
model cannot simulate materials which have specular reflections. For
them, another technique is necessary; Unity4.x adopts the Blinn-Phong model. Rather than calculating the dot product between the normal and the light direction , it uses which is the vector halfway between and the view direction :
The quantity is then processed further using the and settings. If you need more information on how Unity calculates its lighting models, you can download the source for its built-in shaders. Both the Lambertian and Blinn-Phong surface functions are calculated in the file Lighting.cginc. In Unity5 they’re available as Legacy shaders.
Physically Based Rendering in Unity5
As mentioned at the beginning of this
post, Uniy4.x was using the Lambertian lighting model as its default
shader. Unity5 has changed that, introducing the Physically Based Rendering
(PBR). The name sounds very intriguing, but is nothing more then
another lighting model. Compared to the Lambertian reflectange,
PBR provides a more realistic interaction between lights and objects.
The term physically refers to the fact that PBR takes into
account physical properties of materials, such as conservation of energy
and light scatter. Unity5 provides two different ways for artists and
developers to create their PBR materials: the Metallic workflow and the Specular workflow.
In the first one, the way a material reflects light depends on how
metallic it is. A cheap explanation is that light is an electromagnetic
wave, and it behaves differently when in contact with a conductor or an insulator.
In the Specular workflow, a specular map is provided instead. Despite
being presented as two different things, Metallic and Specular
materials are actually different ways to initialise the same shader; Marmoset
has a very well done tutorial in which it shows how the same
material can be created both with the Metallic and Specular workflows.
Having two workflows for the same thing is one of the main sources of
misunderstanding when approaching Unity5 shaders for the first time. Joe Wilson
made an incredibly clear tutorial oriented to artists: it’s a good
starting point if you want to learn how to use PBR to create highly
realistic materials. If you need some more technical information,
there’s a very well done primer on PBR on the Unity5 blog.
The name of Unity5’s new lighting model is, simply,
Standard.
The reason behind this name is that PBR is now the default material for
every new object created in Unity3D. Moreover, every new shader file
created is automatically configured as a PBR surface shader:
1
2
3
4
5
6
7
8
9
10
11
12
13
14
15
16
17
18
19
20
21
22
23
24
25
26
27
28
29
30
31
32
33
34
35
36
37
38
39
40
41
Shader"Custom/NewShader"{
Properties{
_Color("Color",Color)=(1,1,1,1)
_MainTex("Albedo (RGB)",2D)="white"{}
_Glossiness("Smoothness",Range(0,1))=0.5
_Metallic("Metallic",Range(0,1))=0.0
}
SubShader{
Tags{"RenderType"="Opaque"}
LOD200
CGPROGRAM
// Physically based Standard lighting model, and enable shadows on all light types
#pragma surface surf Standard fullforwardshadows
// Use shader model 3.0 target, to get nicer looking lighting
#pragma target 3.0
sampler2D _MainTex;
structInput{
float2 uv_MainTex;
};
half _Glossiness;
half _Metallic;
fixed4 _Color;
voidsurf(Input IN,inout SurfaceOutputStandardo){
// Albedo comes from a texture tinted by color
fixed4c=tex2D(_MainTex,IN.uv_MainTex)*_Color;
o.Albedo=c.rgb;
// Metallic and smoothness come from slider variables
o.Metallic=_Metallic;
o.Smoothness=_Glossiness;
o.Alpha=c.a;
}
ENDCG
}
FallBack"Diffuse"
}
Line 14 tells Unity3D that this surface shader will use the PBR lighting model. Line 17 signals
that advanced features are being used in this shader, hence it won’t be
able to run on outdated hardwares. For the same reason,
SurfaceOutput can’t be used with PBR;
SurfaceOutputStandard must be used instead.
PBR surface outputs
Along
Albedo,
Normal,
Emission and
Alpha, there are three new properties available in
SurfaceOutputStandard:
halfMetallic: how
metallic the object is. It’s usually either 0 or 1, but intermediate
values can be used for bizarre materials. It will determine how light
reflects on the material;
halfSmoothness: indicates how smooth the surface is, from 0 to 1;
halfOcclusion: indicates the amount of ambient occlusion.
If you want to use the Specular workflow, you should use
SurfaceOutputStandardSpecular which replaces
half Metallic with
float3 Specular. Note that while the Lambertian reflectance has a specular field which is
half, the specular property in PBR is a
float3. It corresponds to the RGB colour of the specularly reflected light.
Shading technique used in Unity
So far, four different shading
techniques have been introduced. To avoid confusion, you can refer
to the table below which indicates, in order: shading
technique, surface shader name, surface output structure name and the
name of the respective built-in shader.
Physically Based Rendering (Specular) StandardSpecular,
SurfaceOutputStandardSpecular
Standard (Specular setup)
The equations behind PBR are rather
complicated. If you are interested in understanding the Maths behind
it, both the Wikipedia page for Rendering equation and this article are good starting points.
If you imported the Unity3D package (which includes
the shader used in this tutorial), you’ll notice how the built-in
“Bumped Diffuse” shader yields a very different result compared to
its naive implementation “Simple Lambert”. This is because Unity3D’s
shader adds additional features, such as normal maps.
Conclusion
This post introduced custom
lighting models for surface shaders. The Lambertian and Blinn-Phong
models are briefly explained, with a real example of how they can be
changed to obtain different effects. It is important to notice that
purely diffuse materials don’t really exist in real life: even the most dull material
you can think of will have some specular reflection. Diffuse materials
were very common in the past, when calculating specular reflections
was too expensive.
The post also shows what physically
based rendering is, and how it can be used in Unity5. PBR shaders are
nothing more then surface shaders with a very advanced lighting model.


 You
may already know something about GIT, Subversion or any other VCS out
there. As a matter of fact, “knowing something” is only a small piece of
what you may learn. You should focus on learning about important but
infrequently used features of VCS of your choice. Why? Mostly because
VCS systems are much more powerful that you think, and unfortunately
many users are using these as nothing more than a backup and
synchronized solutions. For example, did you know that GIT allows you to
stash your changes, so you can work on them later without committing
anything to your master branch?
You
may already know something about GIT, Subversion or any other VCS out
there. As a matter of fact, “knowing something” is only a small piece of
what you may learn. You should focus on learning about important but
infrequently used features of VCS of your choice. Why? Mostly because
VCS systems are much more powerful that you think, and unfortunately
many users are using these as nothing more than a backup and
synchronized solutions. For example, did you know that GIT allows you to
stash your changes, so you can work on them later without committing
anything to your master branch?



 on the fade depends on the angle between the normal
  and the light direction
  . In the Lambertian model, this quantity is equal to the vertical component of the incident light ray: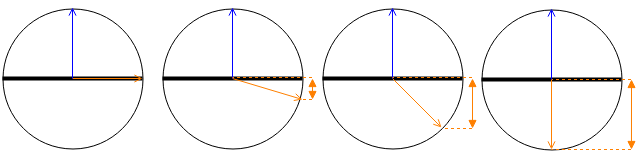
![\[I= \left \| L \right \| \, cos \alpha = cos \alpha\]](https://www.alanzucconi.com/wp-content/ql-cache/quicklatex.com-e49888b0f2b5c15d7a5765cdc5cd0946_l3.svg "Rendered by QuickLaTeX.com")
 is the length of
  is the angle between
 ![\[A \cdot B = \left \| A \right \| \, \left \| B \right \| \, cos \alpha\]](https://www.alanzucconi.com/wp-content/ql-cache/quicklatex.com-c24f181f3ce8adaef10c640afde35e0b_l3.svg "Rendered by QuickLaTeX.com")
 1
when they are parallel. We’ll use it as a multiplier coefficient to
determine how much light triangles receive from a light source.
1
when they are parallel. We’ll use it as a multiplier coefficient to
determine how much light triangles receive from a light source.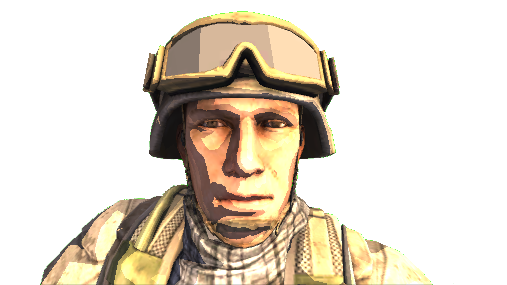
 which is the vector halfway between
  :
:
![\[\mathrm{Lambertian\,model:} \,\,\,\ I = N \cdot L\]](https://www.alanzucconi.com/wp-content/ql-cache/quicklatex.com-932735d63a92ddee6157ad2166cd9a2b_l3.svg "Rendered by QuickLaTeX.com")
![\[\mathrm{Blinn-Phong\,model:} \,\,\,\ I = \left ( N \cdot H \right )^{specular} \cdot gloss\]](https://www.alanzucconi.com/wp-content/ql-cache/quicklatex.com-19ce38f13f4028cb2ae31e0bb793c0e6_l3.svg "Rendered by QuickLaTeX.com")
![\[H = \frac{L+V}{\left| L +V\right|}\]](https://www.alanzucconi.com/wp-content/ql-cache/quicklatex.com-96e761213171348df98933bf5e460a2e_l3.svg "Rendered by QuickLaTeX.com")
 is then processed further using the
  and
and  settings. If you need more information on how Unity calculates its lighting models, you can download the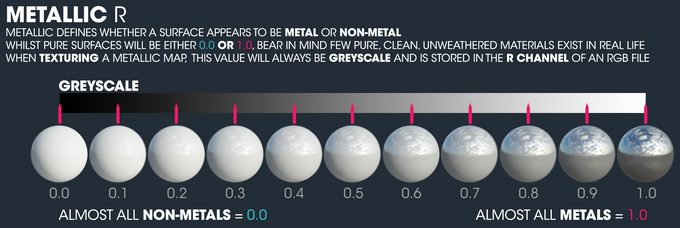

![\[I = N \cdot L\]](https://www.alanzucconi.com/wp-content/ql-cache/quicklatex.com-dd123fc00c1bf8350269b8692692efdb_l3.svg "Rendered by QuickLaTeX.com")
![\[I = \left ( N \cdot H \right )^{specular} \cdot gloss\]](https://www.alanzucconi.com/wp-content/ql-cache/quicklatex.com-66d2635e307989a062334515b5274059_l3.svg "Rendered by QuickLaTeX.com")