Nov 13, 2017

Custom data computed per-vertex - Unity Shader Bug fix

On Unity's web site (https://docs.unity3d.com/2017.3/Documentation/Manual/SL-SurfaceShaderExamples.html), Custom data computed per-vertex Shader has a bug, when I try the shader I get correct result in Scene view but not int Game view.


The fix is normalizing the normals.Just add normalize.

void vert (inout appdata_full v, out Input o) {
            UNITY_INITIALIZE_OUTPUT(Input,o);
            o.customColor = normalize(abs(v.normal));

}

Then correct result is:


Nov 5, 2017

How To Make Google Chrome Faster? (2017)

The increased use of the internet and the quick internet services has led the users to run out of the patience for the slow connectivity. Therefore, in recent times, we have observed that people are looking for the options or the alternatives we can say to increase the speed for loading the pages on the net.
Google chrome, being the huge part of the top search engine company, did not need any introduction. The reason why sometimes the speed of the chrome falls down because of the RAM usage and the recent updates now although has decrease the speed of the usage of the RAM. The increasing demand to know how to make google chrome faster, we are here introducing the techniques so as to increase the pace of the surfing the Google.
From the web, you can browse as many as tips to know how to increase the speed to browse the Google from the chrome, but all you will have is the repeated tricks and tips, maybe you must have already used. In the post we have share some of the best assistance to increase the speed of the Google chrome browser, and trust us, they are believed to be playing the major role in doing so. You can also check our post on how to increase the download speed in IDM, IDM optimizer if you are the user.
As we are aware, Chrome is one of the popular and smartest browsers available online. It has got variety of features which makes this browser quite easy to use and helpful in surfing online. The below given are some interesting speed up chrome tips which you can follow to make chrome faster.


Enabling Experimental Features

As we know chrome browser has a special page of experimental features. This features are still in development and it will be applied soon in future. But here it also give us the ability to enable it. So do not waste your time and just open chrome://flags and enable the following features:
Setting 1: Faster Image Loading
Press Ctrl+F and find “num-raster-threads“, you will see “Number of raster threads” feature. You need to change the value of it to 4 from default.

Number of raster threads

Setting 2: Faster Close Windows/Tabs
Press Ctrl+F and search for “enable-fast-unload“. Click on Enable link, this will make closing of tabs faster.
Close Tabs/windows faster

Setting 3: GPU Acceleration
Press Ctrl+F and search for “ignore-gpu-blacklist“. Click on Enable link, this function will ignore those GPUs which has less performance & video RAM and it lets chrome to use the available VRAM.
GPU Acceleration

Setting 4: Smooth Scrolling
Press Ctrl+F and search for “smooth-scrolling“. Click on Enable link, this will do what it says.
Smooth Scrolling

Disabling the DNS Preloading

Another great technique to get google faster is disabling the DNS preloading. This is one of the major features present in the Google Chrome and it helps in saving the cache of the Domain Name Servers. This would ultimately assist in loading the browser and even disable them along with saving the cache. All you have to do is follow the various steps given in the Google Chrome as shown below to speed up google chrome.
Go to Setting – Advanced Setting – Privacy. Here you will find two options:
  • Use a web service to help resolve navigational errors
  • Use a prediction service to help complete searches and URL’s typed in address bar
Disable both the services to speed up chrome browser. Checkout the below snapshot to have more clear idea about how to speed up google chrome using this tweak.

disabling dns preloading

Enable Prefetch Resources

Enable Prefetch Resources
Go to Setting> Advance Settings> Privacy. This option is pre enabled in latest Google Chrome browser. This feature does just what it says “Prefetch resources to load pages more quickly”. Resources means “Javascript” or any other types of script that the page might have will be stored in you PC locally and retrieve it when needed. This will definitely speed up chrome browser.

Enable SPDY/4

This will speed up your overall page loading time by making the web transaction speed to maximum. Search for Enable SPDY in find option and click the blue title Enable link in the option. After clicking you will notice the color change from light grey and the that blue link should now say “Disable”
enable spdy 4

Disabling Plugins

There is no doubt that the Google Chrome’s plugin are quite helpful but they often make the Google Chrome slow and affects the performance. Frankly, it is better if you simply remove them after their usage. This will give you the solution for your query of how to make chrome faster. Also check our most popular post of 7 best possible ways to make android run faster.
The following are the steps to be followed in removing the plugins
  • Go to Settings – Extensions – Dustbin button after every extension that you want to delete from your browser.
disabling plugins

Clearing Browsing Data Regularly

One of the best way to speed up chrome is clearing the browsing data regularly. Basically, the saved cache and the other kinds of saved data like the login details, browser history, saved forms, etc. dumps a heavy weightage on your browser. So, it is kind of better if you clear them which will make google chrome faster. Also check a simple guide to speeding up wordpress blog.

For clearing them, you need to follow the given steps

  • Go to Settings – History section or (Ctrl+H) – Clear Browsing Data
clearing browsing data

Set Maximum Tiles to 512

Here we are going to change the number of “maximum tiles for interest area”. This feature is used to increase the RAM that chrome is allowed to use. It will also take any little glitch out of your browsing experience.
Open Chrome://flags and Find Maximum Tiles. Now click on the drop down menu and change default to 512.
Maximum Tiles

Disabling the Image Content

If you have plans to boost the Internet speed or wants to make google chrome faster, then the first thing that you need to do is disable the images present in the browser. Once you do it, the websites may not look that cool but the browser will be very much fast. This will be the best solution for how to speed up google chrome.
In your google chrome URL bar, Enter: chrome://chrome/settings/content, in Image section, click on Do not show any images. This will 100% surely make your google chrome run faster. Follow below snapshot:
disabling the image content

Using Data Saver Extensions

Now this is a useful Google Chrome extension which will be the answer for how to make chrome faster. Basically, this will assist in saving a lot of the Internet data which you have browsed and stored. Plus you can easily boost up the Internet speed to a certain extend. So, download this Data Saver Extension on your Google Chrome.
data server extension chrome

Offline Cache Mode – Enable

When you feel your internet connection is disturbed by the unknown factors, the Google chrome allows you to load the cache version of the website’s homepages. To enable them, all you have to do is-
Search Enable Chrome option> click on Enable from the offline cache Mode row.
offline cache mode enable

Experimental Canvas Features – Enable

In order to increase the page loading duration and boosting the performance of the chrome, the experimental canvas allows the chrome to make the best use of the opaque canvases. From the chrome, to enable the feature, you need to search for experimental canvas and click on enable option. You are done!
Enable Experimental Canvas Features

Experimental WebSocket Feature – Enable

The Websocket feature will help you to deal and manage the communication of web traffic in the unique way. You can find this feature on the chrome and just click on enable option after finding it.
Enable Experimental Websocket Implementation

Touch Events – Enable

The touchscreen devices will not hinder the performance of the chrome; instead it will improve it depending on which touchscreen gadget you are using. It doesn’t matter which touch screen model you are using- iPad, touch screen computer, smartphone or Microsoft surface, search for the touch events and click on enable option, that’s it. You can watch the chrome’s performance improving with the feature.
touch events enable

Accelerated Overflow Scroll – Enable

Long pages on the chrome sometimes are boring, but some of them are interesting. To have the best scroll experience, you can enable the accelerated overflow from the chrome. After enabling the feature, you can watch the content compiling into the one single page thus without overflowing the content on multiple pages.
Enable Accelerated Overflow Scroll

Fast Tabs or Window Close – Enable

Surfing the net during office hours and want to close the tabs quick after the seeing the boss coming towards you, what to do? Maybe this time you won’t be saved but to stay safe all you need to enable fast tab from the chrome. The content will move from your face at the quick pace, working on the chrome’s JavaScript. It handles the independent functioning of the graphical user interface (GUI).
Enable Fast Tab/Window Close

Checking for the conflicts with 3rd Parties – Enable

While the function works only on windows devices, it has proved to be very useful. This function will be useful to you when you are in middle of something important work and the website decides to crash in between. The function will help you to check any malware or software dysfunctionality in the background, becoming the reason for the sudden crash down of the website. The conflict with 3rd Parties option can be found on the chrome and enable it.
 

All the mentioned tips to increase the speed of the Google chrome browser are authentic and you can try all of them by yourself. These tips can though help you to speed up chrome browser but it also depends on how you are using the browser and what kind of websites you are launching on it. All these methods are easy to use and also all of them can be accessed with the average internet speed. You can share the tips with your friends on the social networking sites like Facebook, Google+ or Twitter.


Nov 3, 2017

The 10 Most Common Mistakes That Unity Developers Make

Unity is a great and straightforward tool to use for multi-platform development. Its principles are easy to understand, and you can intuitively begin to create your products. However, if some things are not taken in mind, they’ll slow your progress when you proceed with your work to the next level, as you are moving from initial prototype phase or approaching a final release. This article will provide advice on how to overcome most common problems and how to avoid fundamental mistakes in your new or existing projects. Please note, the perspective of this article is focused more on 3D application development, but everything mentioned is applicable for 2D development as well. 

Common Unity Mistake #1: Underestimating Project Planning Phase

For every project, it’s crucial to determine several things before the application design and programming part of the project even begins. These days, when product marketing is an important part of the whole process, it’s also important to have a clear idea of what the business model of the implemented application will be. You have to be sure what platforms you will be releasing product for, and what platforms are in your plan. It’s also necessary to set the minimal supported devices specifications (will you support older low-end devices or just more recent models?) to have the idea of what performance and visuals you can afford. Every topic in this article is influenced by this fact. From a more technical point of view, it should be necessary to set in advance the whole workflow of creating assets and models while providing them to the programmer, with particular attention to iteration process when the models will need some more changes and refinements. You should have a clear idea about desired frame rate and vertex budget, so the 3D artist can know in what maximal resolution the models have to be, and how many LOD variations he has to do. It should also be specified how to unify all the measurements to have a consistent scale, and import process throughout the whole application. The way the levels will be designed is crucial for future work because the division of the level influences the performance a lot. Performance concerns have to always be in your mind when designing new levels. Don’t go with unrealistic visions. It’s always important to ask yourself the question “can it be reasonably achieved?” If not, you shouldn’t waste your precious resources on something hardly achievable (in case it’s not part of your business strategy to have it as your main competitive advantage, of course).

Common Unity Mistake #2: Working with Unoptimized Models 

It’s critical to have all your models well prepared to be able to use them in your scenes without further modifications. There are several things that the good model should fulfill. It’s important to set the scale correctly. Sometimes it’s not possible to have this correctly set from your 3D modeling software because of different units these applications are using. To make everything right, set the scale factor in models import settings (leave 0.01 for 3dsMax and Modo, set 1.0 for Maya), and note that sometimes you will need to re-import objects after changing the scale setting. These settings should assure that you can use just basic scale 1,1,1 in your scenes to get consistent behavior and no physics problems. Dynamic batching will also more likely work correctly. This rule should also be applied on every subobject in the model, not just the main one. When you need to tweak object dimensions, do it with regards to other objects in 3D modeling application rather than in Unity. However, you can experiment with scale in Unity to find out appropriate values, but for the final application and consistent workflow, it’s good to have everything well prepared before importing to Unity. Regarding object’s functionality and their dynamic parts - have your models well divided. The fewer subobjects, the better. Separate parts of the object just in case when you need them, for example, to move or rotate dynamically, for animation purposes, or other interactions. Every object and its subobjects should have its pivot properly aligned and rotated with regards to its main function. The main object should have the Z axis pointing forward and pivot should be at the bottom of the object for better placement to the scene. Use as few materials on objects as possible (more on this below). All assets should have proper names which will easily describe its type and functionality. Keep this consistency throughout all of your projects.

Common Unity Mistake #3: Building Interdependent Code Architecture Prototyping and implementation of functionality in Unity is quite easy. 

You can easily drag and drop any references to other objects, address every single object in the scene, and access every component it has. However, this can also be potentially dangerous. On top of noticeable performance issues (finding an object in the hierarchy and access to components has its overhead), there is also great danger in making parts of your code entirely dependent on each other. Or being dependent on other systems and scripts unique to your application, or even on the current scene, or current scenario. Try to take a more modular approach and create reusable parts which can be used in other parts of your application, or even shared across your whole application portfolio. Build your framework and libraries on top of Unity API the same way you are building your knowledge base. There’s a lot of different approaches to ensure this. A good starting point is the Unity component system itself. Complications may appear when particular components need to communicate with other systems of the application. For this, you can use interfaces to make parts of your system more abstract and reusable. Alternatively, you can use an event-driven approach for reacting to particular events from outside scope, either by creating a messaging system or by registering directly to parts of the other system as listeners. The right approach will be trying to separate gameObject properties from program logic (at least something like model-controller principle), because it’s tough to identify which objects are modifying its transform properties, like position and rotation. It should be exclusively its controller’s responsibility. Try to make everything well documented. Treat it always like you should return to your code after a long time and you need to understand quickly what exactly this part of the code is doing. Because in reality, you will quite often get to some parts of your application after some time and it’s an unnecessary obstacle for quickly jumping into the problem. But do not overdo this. Sometimes, an appropriate class, method or property name is quite sufficient.

Common Unity Mistake #4: Wasting Your Performance 

The latest product line of mobile phones, consoles, or desktop computers will never be so advanced that there will be no need to care about performance. Performance optimizations are always needed, and they provide the foundation for making the difference in how your game or application looks like in comparison to others on the market. Because when you save some performance in one part, you can use that to polish other parts of your application. There are a lot of areas for optimizations. The whole article would be needed just to scratch the surface about this topic. At least, I will try to divide this domain into some core areas. 

Update Loops

Don’t use performance intensive things in update loops, use caching instead. A typical example is an access to components or other objects in a scene or intensive calculations in your scripts. If possible, cache everything in Awake() methods, or change your architecture to a more event-driven approach to trigger things just when they’re needed.

Instantiations 

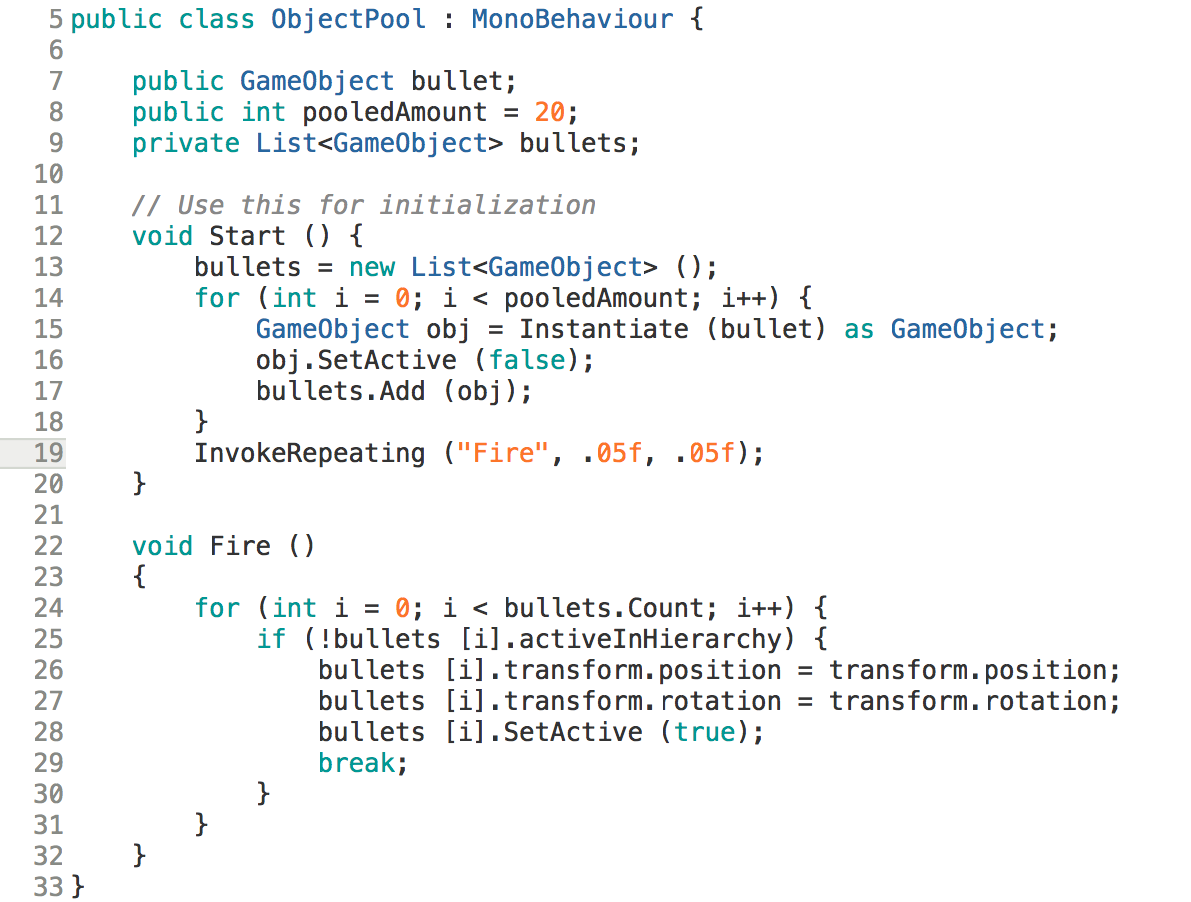
For objects that are instantiated quite often (for example, bullets in an FPS game), make a pre-initialized pool of them and just pick one already initialized when you need it and activate it. Then, instead of destroying it when it is not required anymore, deactivate it and return it to the pool.

Rendering 

Use occlusion culling or LOD techniques to limit rendered parts of the scene. Try to use optimized models to be able to keep vertex count in the scene under control. Be aware, vertex count isn’t just the number of vertices on the model itself, but it’s influenced by other things like normals (hard edges), UV coordinates (UV seams) and vertex colors. Also, a number of dynamic lights in the scene will dramatically influence overall performance, so try to bake everything in advance whenever possible.

Draw Calls 

Try to reduce draw calls count. In Unity, you can achieve draw calls reduction by using static batching for still objects and dynamic batching for the moving ones. However, you have to prepare your scenes and models first (batched objects have to share same materials), and batching of dynamic objects works only for low-res models. Alternatively, you could combine meshes by the script into one (Mesh.CombineMeshes) instead of using batching, but you have to be careful not to create too large objects which can’t take advantage of view frustum culling on some platforms. In general, the key is to use as little materials as possible and share them across the scene. You will sometimes need to create atlases from textures to be able to share one material between distinct objects. A good tip is also to use higher resolution of scene lightmaps textures (not generated resolution, but texture output resolution) to lower their number when you are baking light in larger environments.

Overdraw Problems 

Don’t use transparent textures when not necessary, as it will cause fill-rate problems. It is okay to use it for complicated and more distant geometry, like trees or bushes. When you need to use it, prefer alpha blended shaders instead of shaders with alpha testing or instead of cutout shaders for mobile platforms. For identifying these problems in general, try to lower the resolution of your application. If it helps, it might be possible that you have these fill-rate problems, or you need to optimize your shaders more. Otherwise, it can be a more memory problem.

Shaders 

Optimize your shaders for better performance. Reduce the number of passes, use variables with lower precision, replace complicated math calculations with pre-generated lookup textures. Always use a profiler to determine the bottlenecks. It’s a great tool. For rendering, you can also use awesome Frame Debugger, which will help you learn a lot about how things work in general when decomposing rendering processes with it.


Common Unity Mistake #5: 

Ignoring Garbage Collection problems It is necessary to realize that despite the fact that Garbage Collector (GC) itself helps us to be really efficient and focused on important things in programming, there are a few things we should be explicitly aware of. The usage of GC isn’t free. Generally, we should avoid unnecessary memory allocations to prevent GC from firing itself too often and thus spoiling performance by framerate spikes. Ideally, there shouldn’t be any new memory allocations happening regularly each frame at all. However, how can we achieve this goal? It’s really determined by application architecture, but there are some rules you could follow which help:
  • Avoid unnecessary allocations in update loops. 
  • Use structs for simple property containers, as they’re not allocated on the heap. 
  • Try to preallocate arrays or lists or other collections of objects, instead of creating them inside update loops. 
  • Avoid using mono problematic things (like LINQ expressions or foreach loops, for example) because Unity is using an older, not ideally optimized version of Mono (at the time of writing it is modified version 2.6, with upgrade on the roadmap). 
  • Cache strings in Awake() methods or in events. 
  • If update of string property in update loop is necessary, use StringBuilder object instead of string. 
  • Use profiler to identify potential problems.

Common Unity Mistake #6: Optimizing Memory and Space Usage Last 

It is necessary to keep the attention on the lowest memory and space usage of the application from the beginning of the project, as it is more complicated to do it when you leave optimization for pre-release phase. On mobile devices, this is even more important, because we are quite short on resources there. Also, by exceeding 100MB size of the installation, we can lose a significant amount of our customers. This is because of the 100MB limit for cellular network downloads, and also because of psychological reasons. It is always better when your application doesn’t waste customer’s precious phone resources, and they will be more likely to download or buy your app when its size is smaller.

For finding resource drainers, you can use editor log where you can see (after every new build) the size of resources divided into separate categories, like audio, textures, and DLLs. For better orientation, there are editor extensions on the Unity Asset Store, which will provide you a detailed summary with referenced resources and files in your filesystem. Actual memory consumption can also be seen in the profiler, but it is recommended to test it when connected to build on your target platform because there are a lot of inconsistencies when testing in an editor or on anything other than your target platform.

The biggest memory consumers are often textures. Preferably, use compressed textures as they take much less space and memory. Make all textures squared, ideally, make the length of both sides power of two (POT), but keep in mind Unity can also scale NPOT textures to POT automatically. Textures can be compressed when being in the POT form. Atlas textures together to fill the whole texture. Sometimes you can even use texture alpha channel for some extra information for your shaders to save additional space and performance. And of course, try to reuse textures for your scenes as much as possible, and use repeating textures when it is possible to retain good visual appearance. For low-end devices, you can lower the resolution of textures in Quality Settings. Use compressed audio format for longer audio clips, like the background music.

When you are dealing with different platforms, resolutions or localizations, you can use asset bundles for using different sets of textures for different devices or users. These asset bundles can be loaded dynamically from the internet after the application was installed. This way, you can exceed the 100MB limit by downloading resources during the game.


Common Unity Mistake #7: Common Physics Mistakes 

Sometimes, when moving objects in the scene, we don’t realize that the object has a collider on it and that changing its position will force the engine to recalculate the whole physical world all over again. In that case, you should add Rigidbody component to it (you can set it to non-kinematic if you don’t want external forces to be involved).

To modify the position of the object with Rigidbody on it, always set Rigidbody.position when a new position doesn’t follow the previous one, or Rigidbody.MovePosition when it is a continuous movement, which also takes interpolation into account. When modifying it, apply operations always in FixedUpdate, not in Update functions. It will assure consistent physics behaviors.

If possible, use primitive colliders on gameObjects, like sphere, box, or cylinder, and not mesh colliders. You can compose your final collider from more than one of these colliders. Physics can be a performance bottleneck of your application because of its CPU overhead and collisions between primitive colliders are much faster to calculate. You can also adjust Fixed Timestep setting in Time manager to reduce the frequency of physics fixed updates when the accuracy of physics interaction isn’t so necessary.


Common Unity Mistake #8: Manually Testing All Functionality

Sometimes there might be a tendency to test functionality manually by experimenting in the play mode because it is quite fun and you have everything under your direct control. But this cool factor can decrease quite quickly. The more complex the application becomes, the more tedious tasks the programmer has to repeat and think about to assure that the application behaves as it was originally intended. It can easily become the worst part of the whole development process, because of its repetitive and passive character. Also, because the manual repetition of testing scenarios isn’t that fun, so there’s a higher chance that some bugs will make it through the whole testing process.

Unity has great testing tools to automate this. With appropriate architectural and code design, you can use unit tests for testing isolated functionality, or even integration tests for testing more complex scenarios. You can dramatically reduce try-and-check approach where you’re logging actual data and comparing it with its desired state.

Manual testing is without a doubt a critical part of the development. But its amount can be reduced, and the whole process can be more robust and faster. When there’s no possible way to automate it, prepare your test scenes to be able to get into the problem you are trying to solve as quickly as possible. Ideally, a few frames after hitting the play button. Implement shortcuts or cheats to set the desired state for testing. Also, make the testing situation isolated to be sure what’s causing the problem. Every unnecessary second in the play mode when testing is accumulated, and the bigger the initial bias of testing the problem, the more likely you won’t test the problem at all, and you will hope that all works just fine. But it probably won’t.


Common Unity Mistake #9: Thinking Unity Asset Store Plugins Will Solve All Your Problems

Trust me; they won’t. When working with some clients, I sometimes faced the tendency or relicts from the past of using asset store plugins for every single little thing. I don’t mean there aren’t useful Unity extensions on the Unity Asset Store. There are many of them, and sometimes it’s even hard to decide which one to choose. But for every project, it is important to retain consistency, which can be destroyed by unwisely using different pieces that do not fit well together.

On the other hand, for functionality which would take a long time for you to implement, it is always useful to use well-tested products from Unity Asset Store, which can save you a huge amount of your development time. However, pick carefully, use the proven ones which won’t bring a lot of uncontrollable and weird bugs to your final product. Five-star reviews are a good measure for a start.

If your desired functionality isn’t hard to implement, just add it to your constantly growing personal (or company’s) libraries, which can be used in all of your projects later again. That way you are improving your knowledge and your toolset at the same time.

Common Unity Mistake #10: Having No Need to Extend Unity Basic Functionality 

Sometimes it may seem that Unity Editor environment is quite sufficient for basic game testing and level design, and extending it is a waste of time. But trust me, it is not. Unity’s great extension potential comes from being able to adapt it to specific problems which need to be solved in various projects. This can either improve the user experience when working in Unity or dramatically speed up the entire development and level design workflow. It would be unfortunate not to use built-in features, like built-in or custom Property Drawers, Decorator Drawers, custom component inspector settings, or even to not build whole plugins with its own Editor Windows.

Conclusion 

I hope these topics will be useful for you as you move your Unity projects further. There are a lot of things which are project specific, so they can’t be applied, but it’s always useful to have some basic rules in mind when trying to solve more difficult and specific problems. You might have different opinions or procedures on how to solve these problems in your projects. The most important is to keep your idioms consistent throughout your project so that anyone in your team can clearly understand how the particular domain should have been solved correctly.

REFERENCE: https://www.toptal.com/unity-unity3d/top-unity-development-mistakes

Maximizing Your Unity Game's Performance

Maximizing Your Unity Game's Performance
A game's performance can make or break the experience. Playing a game that is properly optimized feels smooth and responsive, and it will have a larger audience since it can run on lower-end platforms as well.
Maximizing game performance can be quite relative to the game that you're working on and performance tips that may work for one game may be completely pointless for another. While each game may require a different approach to optimization, these are the key techniques you can implement in most situations.
1. Keep It Simple
I'm putting this first since it should be a general rule for any game that you build. Whenever you design a game you need to determine specifically what you need and, more importantly, what you don't need to include.

I always like to approach development from the perspective of what can I get away with to achieve the same effect?

I enjoy going back to old scripts or projects and finding ways to make something more efficient, often by stripping down the excess. However, think with performance in mind as you're designing it the first time. Don't limit yourself too much, but understand that it's easier to build a performant game from the start rather than trying to restructure things to work better later.
2. Use the Profiler
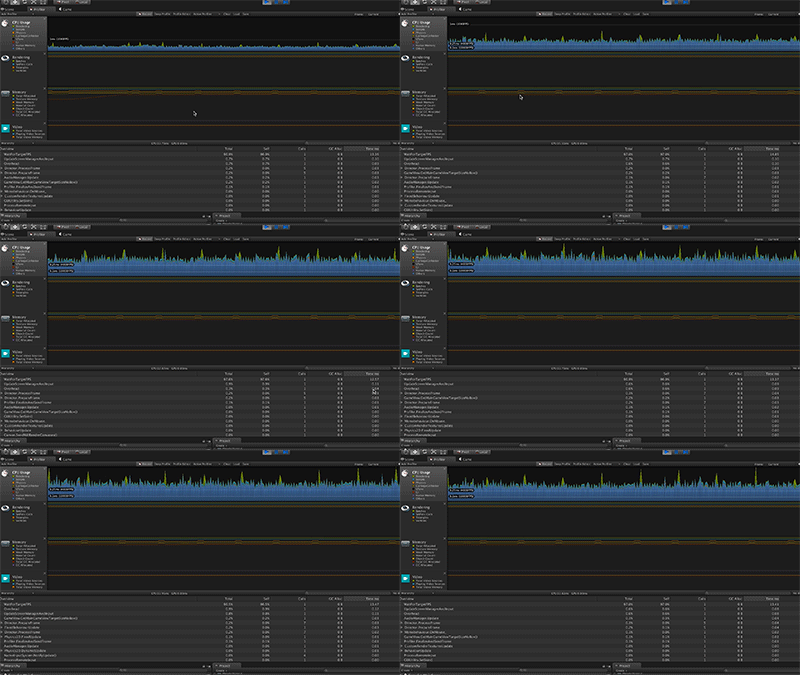
Before you start removing lines of code, refining prefabs, and trying to make everything performant, you need to know what is actually causing performance issues. The Profiler is a great way to get an in-depth look at how your game is performing. You can find the Profiler under Window>Profiler and it will run when you play your game.
Profiler
You'll need to keep the window visible while playing your game. It will display categories such as CPU usage, GPU usage, Rendering, Physics, Audio and more. You can then narrow down the specifics further within each category.
3. Batch Those Game Objects
Often, the visual aspects of a game are going to be one of the big areas in which you can improve performance. Visual elements will impact draw calls.  To put it simply, anything that appears on screen must be "drawn". Imagine having 100 different draw calls for a scene versus optimizing your scene to have less than 5.
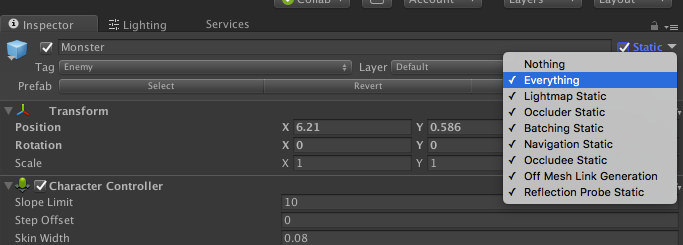
Static Batching is used whenever you set a game object to static. This means that the object will not move, scale, or rotate. Objects that share the same materials will be batched together.  You have probably used this when you're trying to add baked lighting or something like a navigational object to your game. Static batching will be the most performant, so set objects to static whenever possible. If it doesn't need to move for any reason then check the static checkbox at the top right of the inspector.
static
Dynamic Batching is used for objects that will be moving around. Similar to Static batching, it will batch together items of like materials. With dynamic batching there are some unique requirements as per Unity:
  • Batching dynamic GameObjects has certain overhead per vertex, so batching is applied only to Meshes containing fewer than 900 vertex attributes in total.
  • If your Shader is using Vertex Position, Normal, and single UV, then you can batch up to 300 verts, If your Shader is using Vertex Position, Normal, UV0, UV1, and Tangent, then you can only batch 180 verts.
  • Note: attribute count limit might be changed in future.
  • GameObjects are not batched if they contain mirroring on the transform (for example GameObject A with +1 scale and GameObject B with –1 scale cannot be batched together).
  • Using different Material instances causes GameObjects not to batch together, even if they are essentially the same. The exception is shadow caster rendering.
  • GameObjects with lightmaps have additional renderer parameters: lightmap index and offset/scale into the lightmap. Generally, dynamic lightmapped GameObjects should point to exactly the same lightmap location to be batched.
  • Multi-pass Shaders break batching.
  • Almost all Unity Shaders support several Lights in forward rendering, effectively doing additional passes for them. The draw calls for “additional per-pixel lights” are not batched.
  • The Legacy Deferred (light pre-pass) rendering path has dynamic batching disabled because it has to draw GameObjects twice.
Not everything will be batched by Unity. Things like skinned Meshes, Cloth, and other types of rendering components are not batched.
That is batching from the Unity side, but there are ways to improve upon it and even customize batching to your liking. I personally like to combine meshes whenever possible. You can use something likeMesh.CombineMeshes which does exactly what it sound like - it combines meshes.
You could also utilize special assets to do this for you like Simple Mesh Combine from Unluck Software. I've used that asset in a few courses (such as in this lesson for the Tower Defense game) and it's a staple for me when improving the performance of my games.
4. Reduce and Reuse Textures
Since batching works based on like materials, you can combine many objects together if they share one big texture. Multiple high-resolution textures will slow down performance. While you can have these in your game, you need to ensure that you're being selective about how they are being used.
Use a Texture Atlas to combine multiple texture maps into one larger texture map. This is a common technique in AAA games and one you should be utilizing in your games. This not only helps to reduce the number of texture maps used, it also makes everything much easier to organize. This has been done to the extreme at times in games like Rage and Doom with the use of Megatextures and virtual texturing. Here is a video describing this technique if you are curious. Learn about materials and textures and their relationship in our Fundamentals of Materials and Textures course.
5. Use Culling to Limit What is Rendered
This is one of my favorite ways to increase performance, but maybe just because I like the way it looks when testing. To understand how culling works we need to take a look at how objects are rendered in Unity.
By default Frustum Culling is utilized by the camera. To quote Unity:

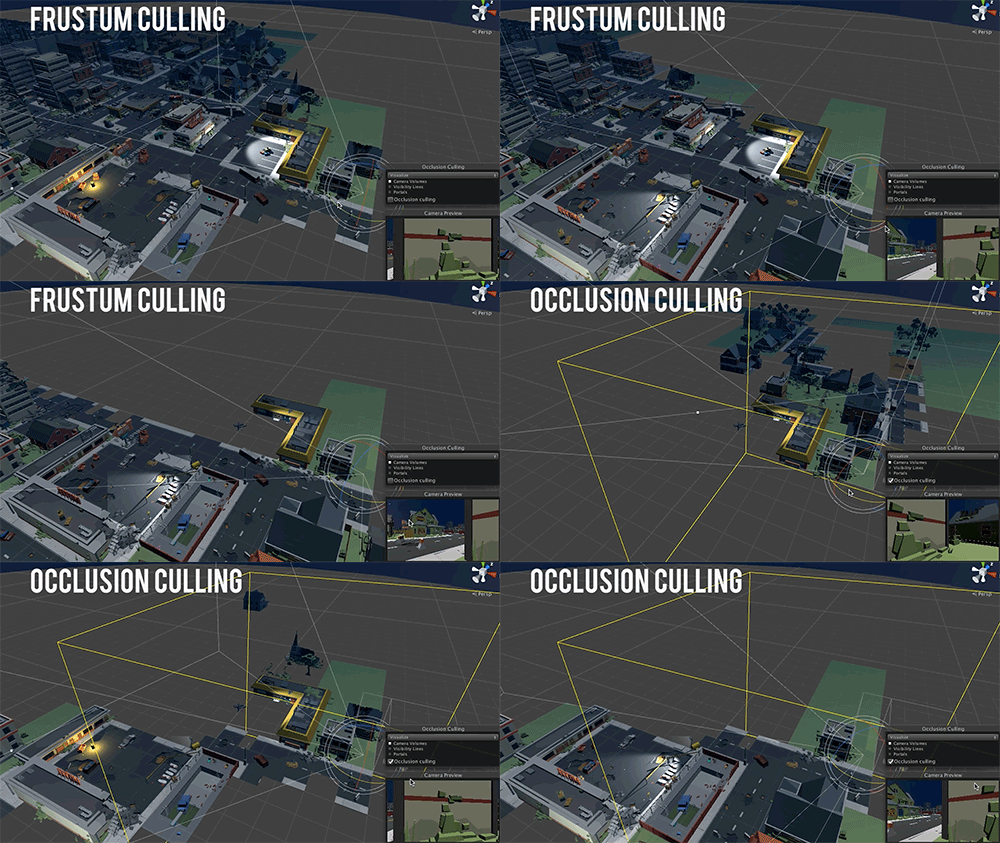
The near and far clip planes, together with the planes defined by the field of view of the camera, describe what is popularly known as the camera frustum. Unity ensures that when rendering your objects those which are completely outside of this frustum are not displayed. This is called Frustum Culling. Frustum Culling happens irrespective of whether you use Occlusion Culling in your game.

culling
Frustum culling is a great way to improve performance and something Unity does by default. The problem with this alone is that it can render objects that we have no direct line of sight with. Imagine standing in front of a door and still rendering all objects behind that door. This is where Occlusion Culling comes in. To occlude is to block, and in this case a game object is blocking the view of other game objects. We can tell Unity not to render objects that are occluded using specific parameters we designate within the occlusion culling window. That allows us to only render objects that we have a direct line of sight to. There's no reason to render an object at the far end of our camera's view unless we can see it directly.
Like many of Unity's built-in features, there are always great assets that can take it to the next level. One that I'd recommend is SECTR VIS, which gives you better control over what can be rendered when.
6. Optimize Objects that are Visible
Limiting texture sizes and combining meshes are a great way to improve performance, along with culling of all sorts. How can we improve the performance of objects that are not being culled but are too far to see in detail? LODs (Levels Of Detail) are a way to render a lower poly version of a mesh when it's outside of a certain range. A mesh that is quite far away can be made incredibly low poly to improve performance.
Mipmaps
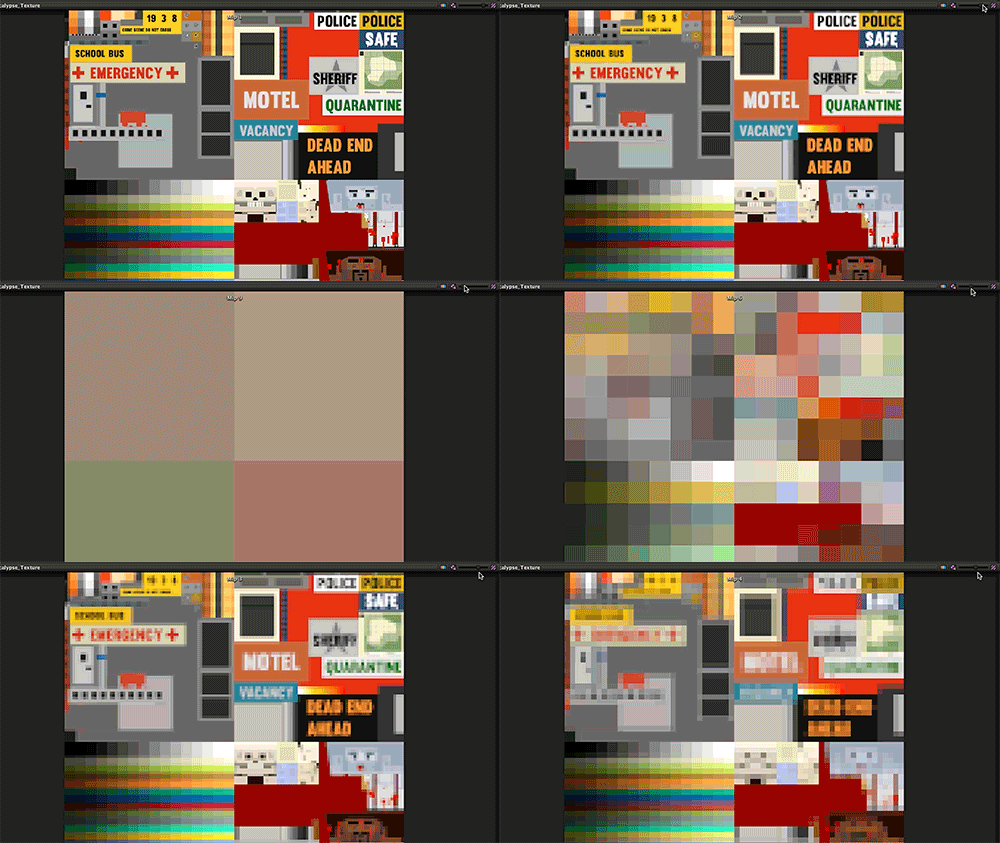
MipMaps are like LODs for texture maps. MipMaps allow textures to be reduced in resolution when far away from the camera. They can also be used if a lower end system is struggling to render a texture at the specified resolution. MipMaps are enabled by default on textures that are imported into Unity and should be enabled unless you are using a camera with a fixed distance at all times and/or using your own unique tools to achieve better performance with your textures.
7. Use Proper Compression and Load Types for Audio
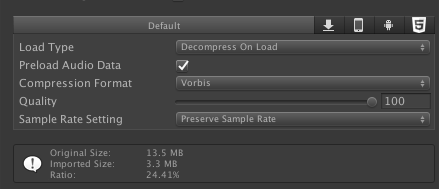
Audio is sometimes overlooked when trying to optimize a game, but it can affect performance just as much as anything visual. Unity supports multiple audio types of which you can explore here. By default it'll import the audio clips to use a load type of Decompress On Load along with a compression of Vorbis.
defaultAudioImport
It's important to note the sizes displayed here. For this one looping audio clip, the imported size is 3.3 MB which adds to the memory needed for our game by exactly that much. The original size is the amount of ram it will take to play that one clip.
Sound effects are typically short and thus have small memory requirements. For these, Decompress on Load would work best, but the compression type should be either PCM or ADPCM. PCM provides higher quality but comes with a bigger file size, which is fine for a very short but important sound effect. ADPCM has a compression ratio is 3.5 times smaller than PCM and is best used for audio effects that are used very often such as footsteps, impacts, weapons, etc.
For longer audio clips such as background music or other large files, it's better to use Compressed in Memory, which results in the file being decompressed right before playing. Streaming is another option as well. According to the Unity docs, streaming uses a minimal amount of memory to buffer compressed data that is then incrementally read from the disk and decoded on the fly.
8. Streamline Physics Calculations
Calculations cover a broad spectrum of mechanics in Unity, but I'll focus on a few that are used quite often.
Raycasts Raycasts are often used to detect other objects for various things like checking distance, weapon impacts, direction, clearance etc. Find only what you need when using a Raycast. Don't use multiple rays if one will suffice and don't extend it past the length that you need it to travel.
Raycasts detect objects, so the less it needs to detect the better. With something like Physics.Raycast, you have the option to utilize a Layer Mask which allows you to only detect objects on a specific layer.
Raycasts
Colliders
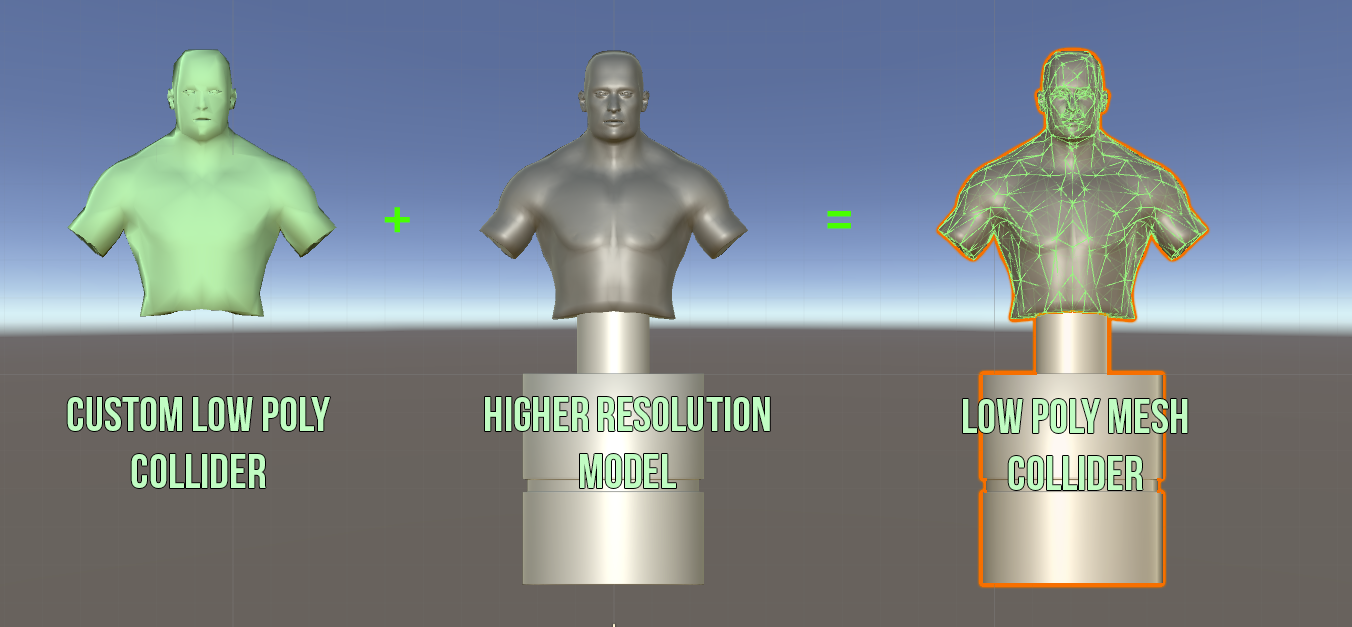
In Unity, you can utilize a number of different colliders ranging from box colliders, to capsule colliders, mesh colliders, and even 2D based colliders. Use primitive colliders whenever possible. These are your basic shapes for colliders such as box, sphere, or capsule. Mesh Colliders take the shape of whichever mesh that you indicate. An example of this would be a human character that has a collider that conforms to their shape.
MeshCollider
This is incredibly expensive to use and should be avoided if possible. If absolutely needed, create a low poly version of the mesh and designate that as your mesh collider instead. To add onto the Raycast section above, Raycasting against mesh colliders is also quite expensive.
Rigidbodies
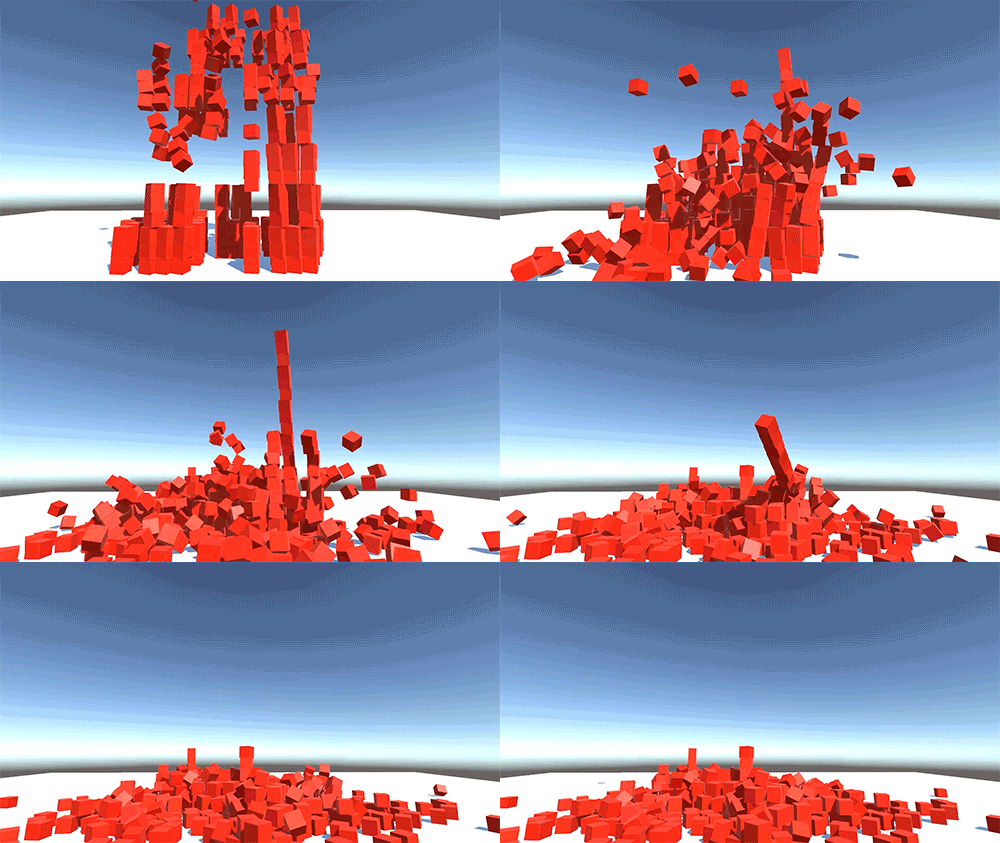
Rigidbodies are typically used to add weight to an object. If an object has a Rigidbody attached, it can then be affected by physics such as gravity other forces. It's important to note that having too many Rigidbody objects within your game will affect performance negatively. For fun, try building a massive wall of Rigidbody cubes that fall to the ground and see how it affects performance in your game. Reducing these to the minimum amount you need is the first step.You can also improve the performance of Rigidbodies you're using by determining when they should sleep.
RigidbodyWall
When sleeping, computation of these objects drops significantly and will stay that way until they are utilized again. It's important to add a Rigidbody component to objects you will be moving around in game, even if they will not be moved using forces. Objects without a Rigidbody are considered static colliders and should not be moved. You can still move them, but it'll come at a drastic performance cost. Set Rigidbody components to "is Kinematic" if you'd like to move them on your own without physics. Learn more about how to use Physics in Unity in our Fundamentals of Physics course.
9. Clean Up Your Code
This area can be quite vast in terms of what you can optimize, so once again I'll just refer to a few areas that commonly need improvements.
Object Pooling
Pooling commonly used objects allows you to reuse them over and over again without destroying them. An example of this would be in a shooting game where a player may shoot physical bullets at. Each of these bullets can be reused once they've been fired, recycling every time by disabling then enabling themselves when needed. This is useful for objects that are used very frequently.
ObjectPooling
Coroutines vs Update
An Update method is called multiple times per second and is often used to refresh things like player input or a score. When reviewing code, I sometimes find them used for updating things that don't need to be refreshed so often. For example, I don't need to update a health status multiple times per second. I only need it to refresh when there is a change in health.
Coroutines can act in place of the Update method by updating a value at a specific time that you specify. They have little overhead and can be used in cases where you need to loop through something and then stop. An example of this would be a fading graphic. Fading using the Update method would be a waste since it does not need to refresh so often. There may also be times when you only need to get an update every so often, like a wave system that deploys enemies every 10 seconds or a power up that slowly decreases over the course of 5 seconds.

Think of creative ways to avoid using Update and see how your performance improves.

Caching Components
This is something everyone should be doing, but I have seen some students using this inefficiently. I typically like to cache components in the Awake or Start methods. By caching, I'm referring to using GetComponent. An example would be something like this:


myText = GetComponent();

where Text is the component I want to get. Don't use GetComponent multiple times in a method when you can cache it once and use that variable throughout the script.
Searching
Avoid using GameObject.Find("MyObjectName"). This is typically done to look for a game object and assign it to some variable. If you need to look for an object in this manner it might be better to use GameObject.FindWithTag("MyTag"), but be aware that since it is looking for a specific tag (which can be applied to many objects) it can be hit or miss unless one object has that tag. The reason to avoid these in regards to performance is because they can be quite slow and, as mentioned before, it's best to add these to the start or awake methods to find them only once.
I personally don't like using either of these because it's quite easy to get stuck with typos. If I am looking for a game object called "Enemy" and I typed GameObject.Find("enemy"), Unity won't find them because I added a lower case letter.
I prefer to manually assign these objects. Not only does that give more freedom, it also makes it easier to make changes to names and hierarchies if needed.
Custom Performance Scripts
When testing a game, one of the first things I'll look at is the Frames Per Second. The FPS is typically a general indicator of how well your game is running. This number can vary greatly depending on the platform that you're running the game on, but you need to have a definite way of checking this regardless. The stats window can be misleading in regards to FPS, so it's best to use either the profiler or a custom FPS script to display on screen when playing the game. You can find some examples of FPS scripts here.
Turn off Unused Scripts
As with a lot of things in your game, if you're not using something, turn it off. Is there a reason to constantly update the waypoints of an enemy that you can't even see? Probably not. Leave only what is necessary on while the rest are disabled and/or turned off.
10. Bake Your Lights
Lighting can be quite a complex topic, but in general you should use the minimum amount of lights necessary to achieve your desired style. Lights can be one of the most expensive aspects of a game, so lower end platforms often struggle with dynamic lighting.
In Unity 5.6 there are there three light modes: Realtime, Mixed, and Baked. Realtime is the best, but it comes at a performance cost. This also allows dynamic shadows, which are also expensive to use. Baked lighting can and should be used whenever possible. This allows you to add lighting to your world while giving you the performance benefits of not having to calculate dynamic light at all times.
MixedLighting
Keep in mind that you can "fake" lighting by using emissive maps, which cause parts of the texture to appear to emit light. An example of this would be the dashboard of a plane that has many small lights. Creating a point light for each of these would be incredibly expensive, but using a series of emissive areas on one big texture map not only serves the same purpose but is also much more performant. Baked lighting and other lighting techniques are taught in our Fundamentals of Lighting course.
11. Use Efficient Shaders
I can't get into the complexities of optimizing shader code here, but we all utilize shaders regardless of whether we create them ourselves or use the built-in shaders. Shaders control all the visual elements in your game so having optimized shaders can greatly improve performance because they require a ton of calculations. While you could go in and start tinkering with the code itself, I would like to point out some general considerations for shader use in regards to performance.
are typically camera based effects which apply to the entirety of what the camera sees, which is usually the whole screen. Things like Global Fog and Fisheye are common image effects that you may have used before. These are almost always going to come at a performance cost and, if used, should be optimized as much as possible. I tend to use image effects as a little extra something to make the visuals a bit more appealing or fun, but stacking too many on top of each other is a sure way to slow things down.
Another way to improve performance is to use mobile friendly shaders, even on higher end platforms. This goes along with the idea of what can I get away with. If you're working on a mobile game you should definitely be using mobile shaders because they require less computation.
MobileShaders
Enable Instancing
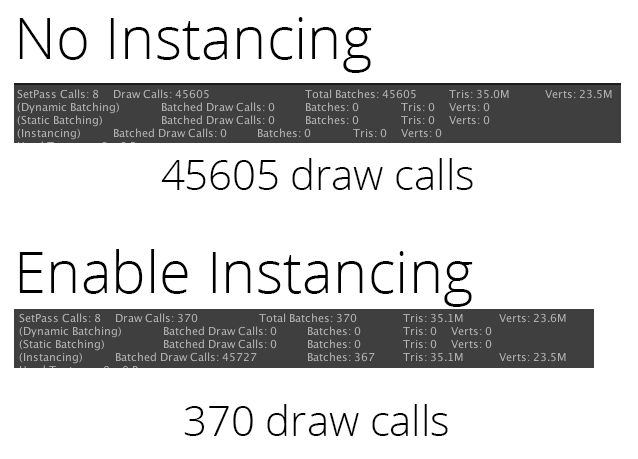
I left this one for last as it is a relatively new performance upgrade that Unity 5.6 utilizes, but it's one of the best tricks I've seen and it's quite easy to use. On the Standard material (and a few others like Mobile and Nature Shaders) you'll see a checkbox at the very bottom under Advanced Options that says Enable Instancing, check that on and you'll see your draw calls drop drastically for all objects that utilize that same material. You'll see bigger performance increases if you have a lot of game objects in your scene that utilize the same material such as an asteroid field, bullet hole impacts, trees, etc.
MaterialInstancing
Wrapping Up
There are many ways to improve the performance of a game that are specific to only one genre or style, but I hope this general overview of common performance tweaks will help you regardless of the type of game you are creating.

REFERENCE: https://cgcookie.com/articles/maximizing-your-unity-games-performance

Visual Studio Keyboard Shortcuts

Playing with keyboard shortcuts is very interesting and reduce the headache of using the mouse again and again while programming with visu...